Monday, January 27, 2014

Quilted duvet cover


In addition to KWC sewing, I managed a little selfish sewing this weekend. I made a quilted cover for my duvet. When I was pregnant with R I went through a big nesting phase at the end where I decided I was going to redo all of the bedroom linens. I did manage to make pillow cases before she was born which by the way are a real treat. I don't think I will ever want regular pillow cases again. I also made pillow cases and a duvet cover for J's room. I wound up placing  the snaps on the wrong way when I tried to finish it up when R was just a newborn so after that point I gave up for a while on decorating. I am back to it and I finally fixed the snaps. His room looks awesome almost a year later. I also made a duvet cover for my room. I didn't use a particular pattern. I kept the design simple and added a bunch of color cotton fabrics. I bought all of the fabrics for the covers and pillow cases on Fabric.com. I love buying fabrics there. The customer service is awesome and the prices are great. I love the selection also. So here are a few photos of my decorating attempts. I am really happy with how everything turned out. I need to take a better photo of J's room. He decided to be a part of the photos of my room. Little did I know he was just waiting to jump on the bed. Well, it looked nice for a few minutes anyway.


KCW Day 1 and 2 - Comfy baby pants and envelope tee


It is KCW or Kids Clothing Week. I made a cute and comfy knit outfit for little sweets. I used the Monster Bunz Pattern for the pants. I made the large size without the circle bum. I am very excited about this pattern. It is so cushy and perfect for a little toddler. The size range is awesome also. The large fits from about 1-3 since the cuffs and waistband can be extended. It is pretty roomy on R now and super easy to get on and off for diaper changes. She also fits into the medium size which ranges from about 3 months to 1 year. The fabric for the pants is from a recycled pair of purple sweat pants I found at Goodwill. There is enough fabric to make two pants actually so very nice.


The envelope tee pattern is from one of my favorite books Growing Up Sew Liberated. I used the book to make the fabulous teepee for J's Christmas present. Well, the book also has really comfy clothing patterns. The envelope tee was easy to put together. I made the 12-18 months size and it fits her well though the sleeves are little long. The material is a cotton knit striped polo shirt from Goodwill. I also used this material to make the cuffs and waistband for the baby pants. She looks really cute in her new outfit. I plan to make a cute dress or pinafore to go with outfit. I received the Girls Style Book for Christmas and I can't wait to try out the patterns. 


Thursday, January 23, 2014

Nighttime one size hybrid fitted diaper


I decided to make a special nighttime diaper for R. My inspiration is the tucked in all night diapers from Bagshot Row Cloth. I saw a link to the diapers on one of the cloth diaper facebook pages I follow and I was really intrigued by the idea of using poly fleece on the outside. I did a little research and if you get the right type of poly fleece then you can make an awesome hybrid diaper. How do you know if you have the right type of fleece? That is a little tricky since there are so many types of poly fleece available. The Windpro fleece from Malden Mills is the gold standard for making hybrid diapers but other types of fleece like blizzard or anti-pill will work well also. If you are not sure then you can add water to the top layer of the poly fleece and press on it. If the water goes through to the other side easily then it won't work well on the outside.

What is a hybrid diaper exactly? It is a fitted diaper that has an extra layer of water resistant poly fleece. For daytime use the poly fleece is hidden and placed next to the outside layer. This provides a water resistant layer that repels moisture back into the soaker layers of the diaper and therefore provides some wetness protection without having a separate cover. No separate cover? That's right. It means you can use all of the cute prints for the outside of the diaper and still be able to see them. Brilliant! The daytime hybrid diapers are not as water resistant as compared to a regular fitted with a cover or so I have seen. I haven't tried one yet but I plan to make one soon. 


Back to making a nighttime hybrid diaper. If you place the poly fleece on the outside of the diaper and add a few extra layers to the wet zone along with a lot of hemp fleece then you can make a super duper nighttime diaper. I made the diaper shown using the Rocket Bottom one size diaper pattern and it has a fold down rise. The outside is 200 weight anti-pill fleece from a recycled Land's End fleece sweater. I tested the poly fleece prior to making the diaper and it seemed very water resistant. I added two additional layers of poly fleece in the wet zone. The diaper has a hidden layer of hemp fleece and a bamboo velour liner. The insert is snap in and petal style. The top petal layer is bamboo velour and three layers o f hemp fleece. The bottom petal is four layers of hemp fleece. I made an additional lay in insert with four layers of hemp fleece to place under the snap in insert. So that makes 14 layers of absorbent fabric.


The diaper is fairly fluffy as you imagine but it works like a charm. When J was younger than 8 months or so I could get away with using a regular daytime diaper for nighttime use. Once he got a little older I found the regular diapers were not adequate for nighttime use. I have been adding extra hemp fleece inserts to R's regular diapers since she is 11 months and that works fine. I don't have wet sheets at the end of the night but I do get a little moisture to the outside. The diaper is totally saturated also so I wanted to make a separate diaper for nighttime use with a high absorbancy. I am really happy with the nighttime diaper so far. R is really comfortable in the new diaper too and I don't have to add a separate cover. I took it off her this morning and it wasn't totally soaked. I am impressed since she is a heavy nighttime wetter. The addition of the poly fleece helps the diaper work better by distributing the moisture throughout the insert layers. So I plan to make a few more and look for the Windpro fleece. While I am it I will make a few daytime hybrid diapers so I can enjoy all the fun fabrics on the outside.

Sunday, January 19, 2014

One size all in two diapers


I continue to make diapers for little sweets. I bought the NykiBaby one size diaper pattern a few years ago and made AI2 diapers for J. I use these diapers for R now which is very nice. I made a few more for R using the same pattern. The outer is sandwich pul that I bought through Swaddlebees. The hidden inner layer is hemp and organic cotton fleece. The liner is bamboo and organic cotton velour. The insert is made snap-in and petal style. The top petal is three layers of hemp fleece topped with bamboo velour. The bottom petal is four layers of hemp fleece. So the total absorbancy is 10 layers which works great for day time use. I also made a super duper night time diaper using the hemp fleece but that will be my next post.


I find the more I use cloth diapers the closer I get to diaper nirvana or finding that sweet spot where I love the diapers. It takes a lot of trial and error to make diapers and to find the right combination but I feel I am getting close. I really like the AI2 diapers for when I am out and about. They are easy to take off and store in a wet bag. They are also fairly simple to put on a wiggly baby. I say fairly simple because as you know nothing is really easy to put on a wiggly baby. R is definitely on the go these days. She is not walking yet, but she crawls really well and can stand on her own for small periods of time. It is exciting to see her learn all these new skills.


Back to the NykiBaby pattern. It is supposed to fit up to 40 pounds but it is already getting a little snug on R on the largest setting and she is around 21 pounds. She is average so I don't think the size goes up that high. From my experience with using it on J and now on R, I would guess closer to 30 pounds depending upon body type. I also measured the pattern next to the Rocket Bottom one I used for the bunny diaper and it is medium size as compared to that pattern. Since it is getting snug and I really like the pattern, I decided to increase the size. I added an inch to the overall width and length. I also added an additional inch to the wing and increased the size for the smallest setting. The larger AI2 has a fun space pul outer, a hidden hemp fleece layer and bamboo velour liner. The insert is snap-in and has eight of layers as the smaller size. I will give the smaller AI2 size diapers to a friend in the next few months so it is good to start sewing now. The larger size should fit R until potty training.


A note on the hemp and organic cotton fleece. It is dyed a lovely green color. I bought it from Pickering Hemp since it was on closeout after the holidays. It is usually $8.75 a yard and I purchased it for $7.50 a yard which is great price for hemp fleece. Shipping was an additional $1.25 per yard but still a good deal. I haven't used hemp fleece in a while so it is really nice to have some again. I love the softness and drape. I made R a pair of awesome pants from the material and will post about it soon. For a little hint I made the pants from the new Monster Bunz pattern. Really cute if you are looking for a baby and toddler pants pattern.

Sunday, January 5, 2014

One size fitted bunny diaper


I am starting to make new diapers for R. She still fits in the medium size diapers I made for her a few months back but the rise is short. Since it can be dangerous for her hiney to hang out I figure it is best err on the side of caution and make her new ones. I bought the Rocket Bottoms one size fitted diaper pattern when it was on sale over the holidays and it is great. The instructions are clear and the pattern is easy to print. I love the fold down rise to make the diaper one size.  It is also a great price if you are looking for a diaper pattern.  I made the diaper pictured with hot pink bamboo velour as the liner, organic cotton fleece for the inside and a really cute pink bunny cotton woven print for the outside. The insert is snap in and petal style with a top layer of hot pink bamboo velour. It has four layers of organic cotton fleece on the inside and four layers of hemp jersey on the outside.


This particular style of diaper requires a cover and you may ask why make a cute diaper when it is going to be covered up anyway. I have often asked myself that very question and I actually made the first newborn diapers for J out of plain hemp jersey. I find though that I am drawn to all the really cute diapers that others make and I see online. I see so many great examples of diapers on sewing facebook pages so I blame the internet. I actually make her diapers really cute because it makes me happy to see them so that is probably reason enough. I am toying with idea of making hybrids that would not require a cover for when she is toddling around at home. If you are new to hybrids they are very popular in the diaper community. It is a fitted diaper with a layer of polyester fleece next to the outer fabric. It helps to repel the moisture back into the soaker layers. I have been sticking with natural fibers for the most part but I may add a few hybrids to the mix for fun. I do love her new pink bunny diaper though and looking at the print definitely makes me happy.


Monday, December 30, 2013

Handmade Christmas wrap up


Christmas was great. It was really fun to sew some of the presents this year. It was also fun to see J so excited for Christmas. He is 5 this year and I think it is the magical year for excitement during the holidays. I stayed up late quite a few nights to finish everything but it was worth all of the effort. Here is a snap shot of our Christmas.


The pattern for the tent is from Growing up Sew Liberated which is a lovely pattern book full of all sorts sewing patterns for creative play. I love everything in the book and the tent pattern was super. It is a really sturdy design and as you can see from the photo above it works for adults also. The main part of the teepee is made out of cotton canvas that I picked up at JoAnns Fabric. The cotton canvas print for the contrast is from Ikea and was used to make the poufs also. The pattern for the floor cushions is from the Living with Punks tutorial. I made the second pouf with a removable cover and I really like the design.


The pattern for the play capes is again from the Growing up Sew Liberated. I made the butterfly one for my 5 year old niece who loves to dress up and play all sorts of wonderful games. The outside is a brocade that I purchased a long time ago at JoAnns Fabric and the inside is a orange cotton knit. I decided to make one for J also and bought a light blue charmeuse for one side and zebra cotton knit print for the other from Fabric.com. In Growing up Sew Liberated she suggests using an animal print for one side. I wasn't sure about making the cape for J since he tends to be more into building than dressing up. He did want me to make him a crown before Christmas so I figured he could use the light blue side to be a king and the other side to be a wild animal. It is took a little bit for him to warm up to the cape but he then wore it on our walk to Riverview Park. He had a great time being ruler of all the lands and then a zebra. I love the photo of him above with his sweet little smile. 


I made Snapazoos to put in J's stocking. The Snapazoo tutorial is on the KAM site along with ideas on how to snap the little critters together.  J's favorite animal was the flying squirrel that he could throw across the house. R like them quite a bit also.


I made blocks for R from scrap quilting fabric. She liked the blocks but I think she actually liked the paper better.


We ended our celebration with a fabulous dinner for Christmas Day. We made smothered seitan with green beans, stuffing, mashed potatoes and cranberry sauce. The recipe links are on our food blog Vegan Scratch.

Monday, December 16, 2013

Monster mash


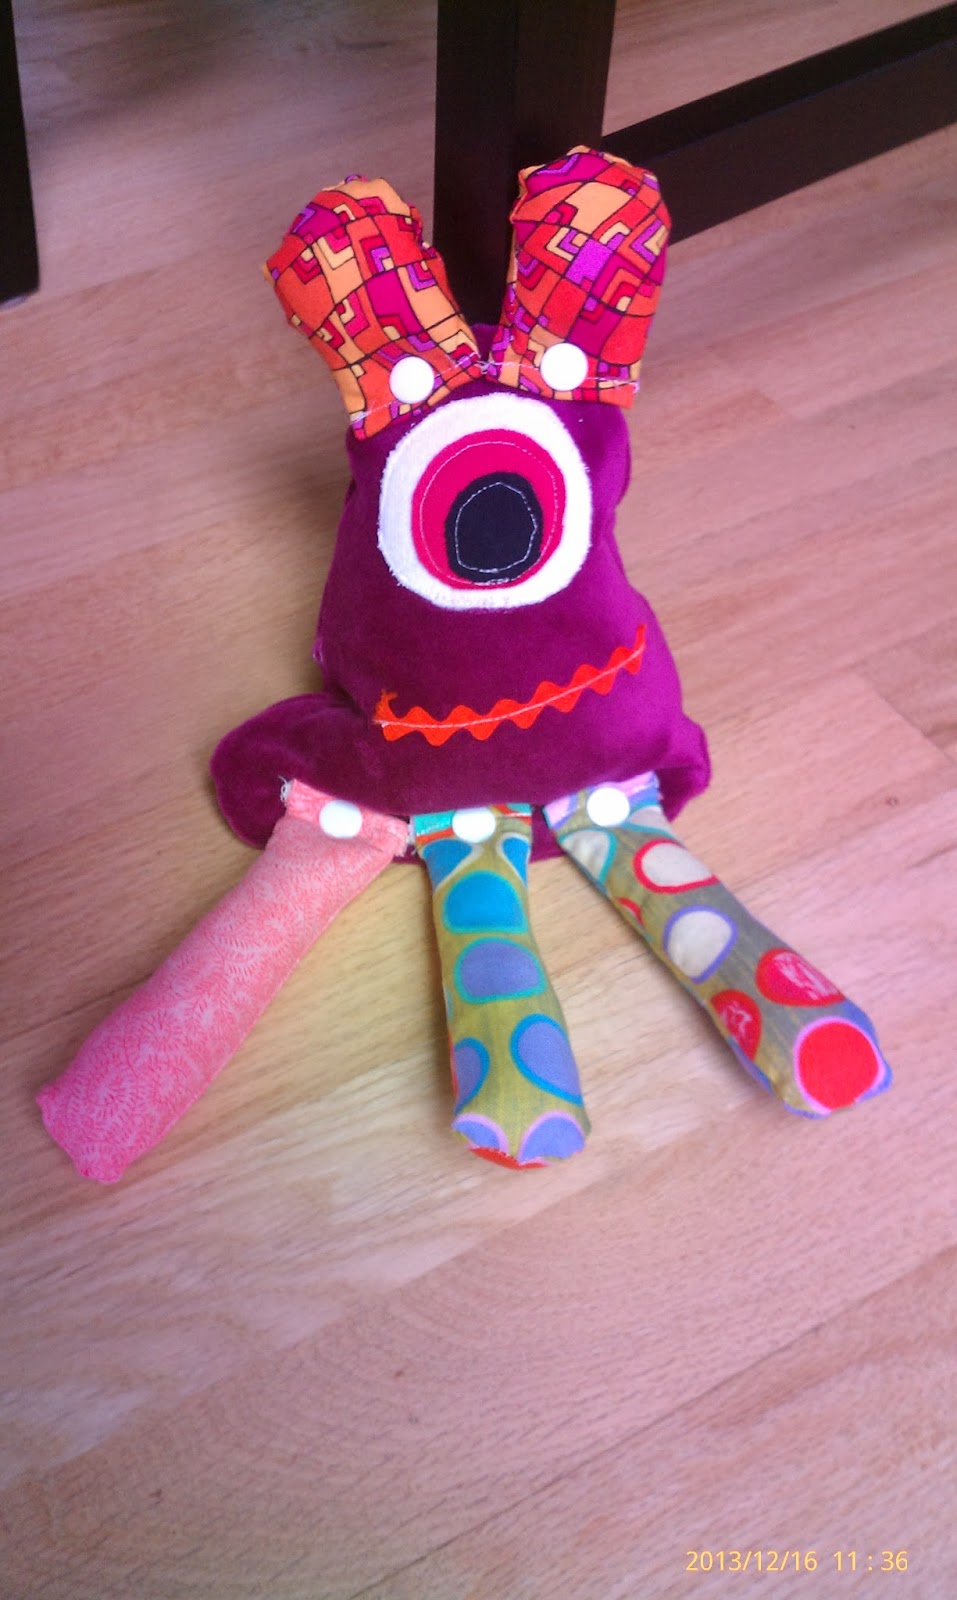
I am continuing to make Christmas presents for the little ones. My latest project is a monster plushie for R. I looked online at a lot of patterns and decided to just wing it and make my own. The body looks surprisingly like Jabba the Hut. I was going for large monster slug and I think I came very close. I made the body out of recycled cotton velour and the eyes out of knit scraps. The back is open and I made a separate insert for stuffing in the body. The insert is filled with rice so it can double as a warm soothie. I made the legs and horns from scrap woven cotton prints. The fun part is I made legs and horns as separate pieces that can be snapped on the main body. My goal is to make a few more and have the parts interchangeable. J had fun tonight mixing up the parts. R won't be able to snap on the pieces for a while but it will be fun for J to make different monster dolls for her.

Thursday, December 12, 2013

Making progress


I'm making progress on Christmas presents. I have the two poofs done and a pattern for the teepee. I bought heavy weight green canvas at the fabric store and I will use the same canvas from the poofs for the contrast. The pattern for the teepee is from Growing up Sew Liberated. I am not sure why I haven't seen this book before. It is fantastic. I love all the patterns. I have high hopes of making the art bag and also the play capes. I just ordered a zebra cotton knit and a light blue satin for the lining of J's cape. I am also going to make one for his cousin. I have a satin brocade with butterflies that I will use for her cape and line it with an orange cotton. So exciting to create all these fun gifts. For R I made baby blocks with ribbon taggies. I am also going to make blocks for her cousin who is due any day now. Very exciting. The blocks come together very quickly and are made from scraps of quilting cotton. I used 5 inch squares. So onward and we will see what else I get made before Christmas. J and I also had fun this past weekend making a Gingerbread House from scratch. He also enjoyed some holiday sensory bin fun.


Tuesday, December 3, 2013

Handmade Holiday

Happy Holidays!!

I decided this year I am going to make most of my Christmas presents. Funny really since this is the year I have the least amount of time for sewing since little pookie is here. No matter though and I am going to rise to the challenge. Yes I only have a few weeks but I tend to kick things in high gear when the deadlines are close. It always worked for me as PhD student and then researcher so I am confident it will work well also as  family designer and seamstress or that is the plan. It is interesting the comments I receive from others about my quest to sew almost everything for the family. I hear often that someone would like to make this or that but where would they find the time. I think most people have some time for creative endeavors but it is a matter of priorities. Maybe sewing or being creative is not high on your list and that is totally fine. However if it is one of those things you always wanted to do then find some time. Look online for a few fun tutorials and then unplug for a while. Well at least unplug from social media. If possible involve your children in the process. J is helping me make soft blocks for R. He is drawing pictures that I will scan and print on fabric for some of the blocks  He is also great at adding the filling. Yes, I sometimes have a mini sweat shop in my house but it is good for him. He learns the value of handmade items. He knows when we buy things that someone made that item and hopefully they did not make it in an actual sweat shop. Another good reason to sew your own clothes but I digress. So we will see how much I get done in the next few weeks. If you need any ideas then follow along with me on Pinterest. I am posting all of my ideas on the Handmade Christmas Board.

Happy Creating!!        


New serger

I finally bought a serger. Woohoo! I bought a Juki MO644d and it is awesome. I really wish I would have bought a serger sooner. It really is fantastic for sewing your own clothes. Anyway, I don't know what I did all these years without one. I am really pleased with the Juki brand also. It came already threaded and all I had to do was reduce the tension and pull new thread through the machine. It sews beautifully and is relatively quiet. Anyway as you can tell I am very happy with my purchase. If you don't own a serger then I suggest you purchase one very soon.

Saturday, August 17, 2013

Baby harem pants


If you are looking for sewing patterns for little ones then you should check out Too Sweets! I found out about them through a friend on facebook. The shop had a giveaway a few months ago for three new pdf patterns and I was lucky enough to win. I received the best harem pants, circle tank and wide leg pants patterns. I just made the harem pants in size 12 months for my little sweetie. I took off about 3 inches of the length of the pants to make knickers. They fit awesome over her cloth diapers and are a cinch to make. I used recycled t-shirt scraps for the pants. The pink is a lycra cotton blend and the yellow is all cotton. The waistband is from a turtleneck. I plan to make longer ones for the fall. So cute and easy for diaper changes.


Natural Soap Making and Himalayan Salt Soaps

I have been making natural soaps and shampoo bars for a few years now. I started making soaps for the local Halo Salt Spa back in 2015. I...