Monday, October 29, 2012
Newborn snap one size ai2 diaper with tutorial
Update: See my latest post on making a one size AI2 diaper.
I started making newborn diapers for our little girl on the way. I have pul covers that I used for J that are a bit worn, but work great for making ai2 newborn diapers. I really like ai2 diapers since are quick drying and very easy to use. I lined the diaper with bamboo/organic cotton velour and made the snap in soaker with bamboo/hemp jersey. The pattern I used is the Darling Diapers Free Newborn Fitted Pattern. I added a snap rise adjustment to allow additional sizing flexibility. Below is a tutorial on how I made the diaper.
1. Print out the diaper pattern. I added a few adjustments to the newborn diaper pattern as shown in the picture including a double row of snaps to shorten the rise and make the diaper one size. I moved in the wing snaps to allow for the seam allowance. I also marked the snap placement for the snap in soaker. Cut one out of pul fabric and mark the snap placement. Mark the location for the elastic. Cut one out of bamboo/organic cotton velour for the lining and mark snap placement for the snap in soaker. The small circles of fabric are for snap reinforcement. The snap in soaker is a modified version of the one included with the pattern. Cut one out bamboo/organic cotton velour and 4-6 layers of bamboo/hemp jersey. Mark the snap placement on the back of the last layer of bamboo/hemp jersey for the soaker.
2. Attach the snaps to the pul outer fabric using the scrap pul circles for reinforcement. Attach the snaps to the liner fabric and also to 3 or 4 layers of the bamboo/hemp jersey fabric for the soaker. Cut two 6 inch pieces of 1/4 inch elastic for the legs and one 5 inch piece of elastic for the back.
3. Sew the pul outer fabric and the bamboo velour inner fabric together with wrong side facing outwards. Leave a small gap at the top of the diaper to turn. Sew on the ends only of the elastic to the markings on the legs and back.
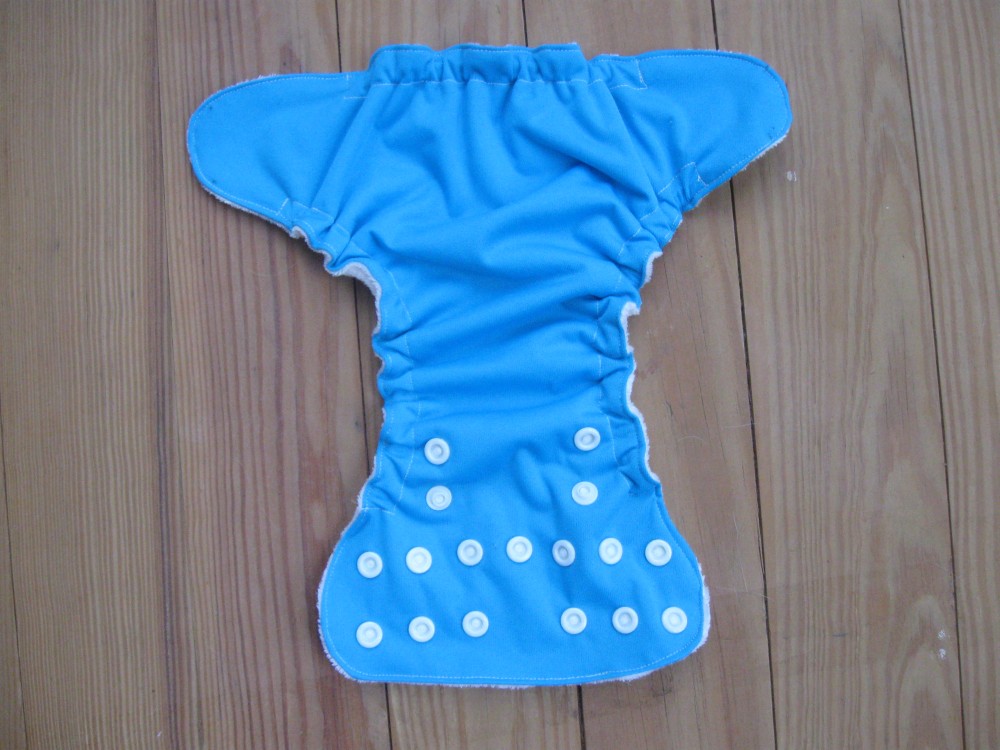
4. Turn the diaper right side out. Stitch around the entire diaper closing the open edge and making sure to not catch the leg and back elastic. Stitch a half inch casing for the leg and back elastic making sure to not catch the elastic in the sewing. This will form a cute ruffle edge for the leg and back elastic.
5. Add the wing snaps and umbilical cord snap to the outside of the diaper. Sandwich all the layers together for the soaker and use a decorative stitch to sew it together. I used a 3 step zig zag. Diaper is all done!
Here is the inside of the diaper with the snap in soaker.
Here is the diaper on the regular setting without the umbilical cord snap.
Here is the diaper on the smallest setting with the umbilical cord snap.
Very tiny and pretty cute!
Thursday, October 18, 2012
Day 4 and 5 of KCWC
For days 4 and 5 of Kids Clothes Challenge Week I made another pair of long johns using the same pattern as for the star jammies from Ottobre design Winter 6/2010. The top is the Villi Viikinki pattern and the bottom is the Pitka Jussi pattern. I used an extra large recycled t-shirt to make both top and bottom. I made the size 110 with no seam allowance and it fits great. I also made fold over cuffs for the top also so it will last him a bit longer. That rounds out my week of sewing for the little guy.
Wednesday, October 10, 2012
Day 3 of KCWC
For day 3 of Kids Clothes Week Challenge I finished the capes I started on Monday. I also made matching arm bands. The cape pattern is the Super Hero Cape pattern from Georgia Leigh. I came up with the arm band pattern using a t-shirt from J. For closures I used plastic resin snaps for the capes and touch tape for the arm bands. The capes were made with quilting weight cotton fabric. I used heat and bond lite for the applique and a small zig zag stitch to hold everything together. J gave cape and arm bands the thumbs up and wore it this afternoon to pick up our CSA share.
Tuesday, October 9, 2012
Day 1 and 2 of KCWC
I am participating in the Kids Clothes Week Challenge where you spend at least one hour per day sewing something fun for your little one. Yesterday I worked on new capes for J and his cousin M. I used the Super Hero Cape pattern from Georgia Leigh. We are going to visit my sister and her family this weekend so figured it would be fun to dress up as a super hero. Today I worked on boxer briefs for J. I made them out of recycled t-shirts and used the pattern from the Ottobre design Winter 6/2010. the design is very similar to the long johns I made for him except the briefs have an additional gusset. They fit wonderfully and he says they are super comfortable so definitely a great pattern.
Tuesday, September 18, 2012
A star is what you are jammies
I am having a lot of fun making clothes for the little guy. He really needs jammies for the winter and I love the patterns for the top and long johns in Ottobre design Winter 6/2010. I have had the pattern book for a while and excited to finally make good use of all the fun designs. The top is the Villi Viikinki pattern and the bottom is the Pitka Jussi pattern. I used an extra large recycled thermal shirt to make both top and bottom. The applique is a simple star pattern which he thinks is really fun since at the end of the gallop book has a star. I made the size 110 with no seam allowance and it fits great. The next pair I am going to make fold over cuffs for the top also so it will last him a bit longer.
Sunday, September 9, 2012
Construction applique tees for the little guy
Little guy started back to preschool and I am busy sewing fun clothes for him. He really seems to enjoy all the things I am making for him now which is a lot of fun. I asked him last night what he would like to have appliqued on his t-shirt. At first he said a wall. How about a dog I said? Or a stove he said. How about a spider I said? Or an iron he said? Talking to him is a lot of fun now. He really comes up with the funniest things. This morning he wanted construction vehicles and I told him I can do that. I bought the t-shirts and used scraps of left over t-shirts for the appliques. I used heat and bond to attach the appliques. I also stitched around the designs. Pretty simple project and he really likes the tees.
Saturday, September 8, 2012
Baby girl on the way!
So the exciting news in our family is that baby number two is on the way and doing well. I am due January 31, 2013. I am currently 19 weeks and we just found out last week that we are having a little girl. I finally started taking belly shots like I did for him. It is really fun to see the belly blossom. It is also super fun this time since he likes to be in the photos and we are using the his chalk board to record the weeks. I am sewing a lot these days and planning to make more cloth diapers. I have a few newborn diapers but they have been through two other babies in addition to him so probably time for new ones. I am also making really cute maternity tops and skirts for myself. The orange top is my latest creations. I made both the top and skirt out of thrift store t-shirts and came up with the patterns from other clothing. I am having fun adding the flowers and trying new designs. I made this top a bit snug though but it will work great next year. I have made a lot of other fun skirts and tops that I will post soon.
Sunday, September 2, 2012
Canning this summer
Our csa at Bellair Farm has pick your own fields which is really awesome for canning. They have several varieties of tomatoes, peppers, green beans and herbs. We picked a lot of tomatoes a few weeks ago and I decided try out a recipe for tomato jam. It is pretty simple and basically sugar along with tomatoes. You cook it for many hours until it thickens. It took quite a bit of tomatoes and only made one pint so not sure if I would do it again but it was a fun experiment and tastes really good. I also found some lovely organic cherries and made sweet cherry jam. I just opened a jar last week and it is pretty yummy.
Monday, August 27, 2012
Lazy Daze craft festival
The Lazy Daze craft festival was on Saturday. The weather was nice in general and a lot cooler than previous years. My booth spot was great and attendance seem good but unfortunately sales were not good. I received a lot of really nice comments on my quilts so very that was great. I also have a good selection of quilts now and new for this year is the smaller size that works great for babies, furry friends and also as wall hangings. I managed to make 12 small quilts and 9 larger ones. I am going to restock my esty shop very soon and see if I can generate any sales. It was really fun hanging out with my sister and her family so a fun a weekend overall. I just need to figure out a way to sell a bit more to make it worth it to go to the shows.
Tuesday, July 31, 2012
Beet coconut milk ice cream
I finally made beet ice cream. I used a version of the vanilla beet ice cream from Fragrant Vanilla Cake. I added one steamed and pureed beet along with coconut milk, sugar, vanilla, soy milk and a little guar gum. The color of the ice cream is amazing. The texture is really good also though I could have used a bit more sugar. I only added 1/4 cup since I thought the beet would add a lot of sweetness. Next time I will add half a cup and it will be perfect.
Saturday, July 14, 2012
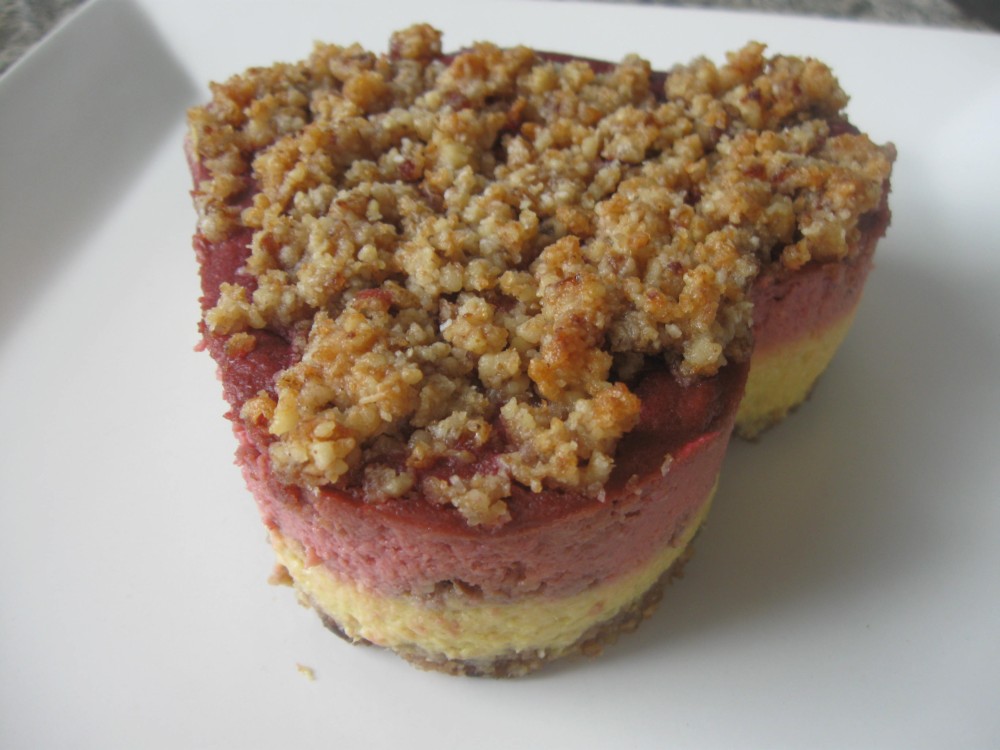
Mango beet cheesecake with coconut crispy rice streusel
At the Post Punk Kitchen they are having an online Chopped contest. The mystery ingredients are fresh mango, red bunch beets, dried unsweetened coconut and crisp rice cereal. I was able to get together an entry this time. I think I was motivated by the fact they included beets which is evident from last post. I decided to make a cashew tofu cheesecake using the beets and mango. The crust and streusel topping have the dried unsweetened coconut and crisp rice cereal. I used one fresh organic mango, one fresh organic beet, organic unsweetened dried coconut and organic brown rice crisp cereal. I came up with the crust recipe and used a version of the Pumpkin cheesecake in Vegan Pie in the Sky by Isa Chandra Moskowitz and Terry Hope Romero.
Mango beet cheesecake with coconut crispy rice streusel
Three mini cheesecakes or one large
Crust and streusel topping
1 cup walnuts
1/2 cup unsweetened dried coconut
8 pitted dates chopped
1/4 cup coconut oil
2 Tbl maple syrup
1 cup crispy rice cereal
Place the walnuts, chopped dates, dried coconut, chopped dates, coconut oil and maple syrup in a food processor. Process until the mixture starts to stick together and the walnuts are ground. Add the crispy rice cereal and process for a few seconds to incorporate the cereal. Take half of the mixture and press it into a spring form pan or I have cute little heart cheesecake pans. Bake at 325 for 15 minutes and remove to cool while you make the filling.
Mango and beet cheesecake filling
I used the recipe from the Vegan Pie in the Sky book as I stated above and I added the mango and beets. I included the raw cashews, silken tofu, coconut oil, cornstarch, lemon juice, salt and vanilla extract from the Pumpkin cheesecake recipe. I also added 1/2 teaspoon of guar gum. I left out the rest of the ingredients. I also omitted the regular and brown sugar. I added 1/4 cup of maple syrup instead. You may want to add more sweetener. Both the mango and beet are really sweet so I figured that would make up the difference. It made a vanilla cheesecake base. I split the batter in two. I added one chopped fresh mango to one batter and processed in the food processor until smooth. I poured this into the heart pans and filled them about half way. I then added a bit of the streusel topping and pressed down gently. To the rest of the batter I added one large chopped steamed beet and processed in the food processor until smooth. I poured the beet batter on top of the mango batter and filled to the top. I added the remaining streusel topping. I baked the cheesecakes and then put them in the fridge to cool for a few hours.
We just had one for dessert this evening and it turned out yummy. I think the other two will be even better tomorrow morning. I may put one in the freezer since that sounds like fun and I think the filling would be really great frozen. I might also make beet ice cream tomorrow and have it with the frozen version.
Subscribe to:
Posts (Atom)
Natural Soap Making and Himalayan Salt Soaps
I have been making natural soaps and shampoo bars for a few years now. I started making soaps for the local Halo Salt Spa back in 2015. I...
-
Hello and welcome! After looking at the entry and exit pages for my blog I found this page is the one that most people view. I decided t...
-
Update: See my latest post on making a one size AI2 diaper . I started making newborn diapers for our little girl on the way. I ha...