Thursday, January 28, 2010

Toddler longies


So it has been really cold here this winter. I am sure I am not telling you anything new since it has been really cold in a lot of places. I finally made Jonas a pair of longies out of some left over synthetic yarn that I had in my stash. I have been intrigued by all the diaper covers that I have seen online and I saw that some people make them out of synthetic yarn also. They work pretty good if you use a tight knitting gauge. The result is similar to using polartec fleece covers. So I decided to make a pair for Jonas to use as a diaper cover and also to keep his little legs warm. The pattern is very similar to the boy bloomers execept it has a lot more shaping and an extra leg gusset. In other words it is a lot more complicated. The longies fit him great with all the extra shaping so it is definitely worth the extra steps. I also really like the gusset since it gives him a lot of freedom of movement. Here are photos of the pants and the little guy in action. He really looks adorable in his knitted pants.


Saturday, January 23, 2010

Toddler recycled t-shirt pants


I am working on a new pants pattern. It is modeled after a variety of yoga pants that I have seen online. It has taken me a lot longer to come up with a pattern than I thought it would since the pants are pretty simple. The first couple of tries were too big in the hip and then too big in the waist. I am also working on the pants rise to accommodate the cloth diapers. Anyway, it is taking a while to come up with a good pattern. It is interesting that before he was born I definitely spent a lot of time thinking about a pattern and making samples. I find that these days I try to be more efficient with my time since I usually don't get large blocks of time for crafting. I do have his afternoon nap time to mull over different ideas. He typically takes a good afternoon nap. I rock him in the rocking chair and either tell him a story or sing him a song and he is off to sleepy time. I am getting close with the pants pattern and here is my result so far. I am going to change the waistband a bit and also work on the cuffs. I would like for the pants to grow with him, but the cuffs are bit too floppy. I think a few more alterations and then it will be good. This pair was made from recycled thrift store t-shirts.

Friday, January 22, 2010

Spinach quinoa waffles


The little guy loves waffles. He generally is not too picky about food. I have noticed that since he turned 18 months that he goes in spurts with eating. It is not that he has any particular thing that he dislikes. It is more that at times he is too busy playing and exploring to want to sit and eat. He then makes it up at the next meal and eats everything in sight. I am glad that he still loves to eat a lot of veggies including his favorite which is any type of greens. I decided to make him waffles with two things that I know he really likes including spinach and quinoa. I have some cubes available in the freezer so it made it really simple to add them to the waffle mix. I had to adjust the liquid level a bit, but they turned out great. He ate them readily with the Creamy Cashew Dip from Eat, Drink & Be Vegan by Dreena Burton. I actually made the dip with almond butter instead of cashew butter. He now asks for "Almo" with his waffles so he likes it a lot.

By the way, I love all of Dreena Burtons cookbooks. She has a lot of kid friendly recipes. She also has a great section on food introduction for infants in her book Vive Le Vegan. I used the introduction schedule and Jonas did great with everything. It has been a lot of fun to cross every stage and add different food items. The book is full of lots of great ideas for feeding a vegan baby and toddler and it has been a great resource. I also like the book from Cathe Olson called Simply Natural Baby Food. I have made a lot of recipes from the book and I love that a lot are low salt and sugar. The book is not vegan, but it easy to adjust most of the recipes. One of his favorites of course is the whole grain waffles with lots of molasses.

Here is the recipe for the Spinach quinoa waffles. I have to say they make a really yummy savory waffle.

Spinach quinoa waffles

1.5 cups whole wheat pastry flour
1 cup all purpose flour
2 teaspoons baking powder
1 teaspoon baking soda
1 1/4 cup rice or soy milk
1/2 cup pureed cooked quinoa
1 cup pureed cooked spinach
1/3 cup oil
1 tablespoon ground flax
1/2 cup soy yogurt

Mix all the dry ingredients together in one bowl. Add all the liquid ingredients together in another bowl. The ground flax can be added to the liquid ingredients. Add the liquid ingredients to the dry and mix until combined. The batter should be fairly thick, but still be able to pour. If it is too thick then add more rice or soy milk. If it is too thin then add more flour. Heat up your waffle iron and start cooking.

Monday, December 14, 2009

Toddler boots


I am making more shoes for the little guy. This time I made a pair of boots that he can wear when we go to indoor play areas or for just hanging out at home. He can also use them outdoors as long as the ground in relatively dry. I made the pair for the tutorial below out of a faux suede that I bought at the local fabric store and leftover recycled fleece scraps. The black pair above is made with black vinyl and red recycled fleece scraps. We have dubbed the black pair as the "Elvis boots" so pretty funny. The pattern is fairly simple and based on the toddler shoes . It is also patterned after a McCalls pattern for baby booties. I enlarged the pattern and also changed the back flap and sole. I tried the original pattern, but was unhappy with the results so since I love to change patterns, I decided I could come up with something that worked better. I am pretty happy with the results and plan to make a few more pairs for the little guy.

Here is the boot pattern in tboot1 and tboot2 . Below are the sewing instructions. The shoe size is approximately a toddler size 6.

Note: A quarter inch seam allowance has been added to the pattern. You can use more if you want the shoes to be a bit smaller.

1. Cut out the pattern pieces. You will need two of each for the inside and outside fabric.


2. Zig-zag all the pieces if you are using material that frays.

3. Sew the front inside and outside fabric pieces together on the narrow curved side. Turn and top stitch.

4. Sew the back inside and outside fabric pieces together along the top and side edge. Turn and top stitch. Sew the casing for the back elastic as marked on the pattern.


5. Cut a 3 inch piece of elastic and thread it through the back casing. Sew both edges to form a gather for the back heel.


6. Grab the shoe bottom and pin on the front and back of the shoe. Sew together and turn right side out. Sew on hook and loop tape or any other fastener that works for you. I used the hook and loop so the little guy can have fun taking his boots on and off by himself.


Tuesday, November 24, 2009

Lots of pies

Apple Pie

The new kitchen is awesome and I am spending lots of time making all sorts of goodies. I love the dishwasher of course and the fact that I can clean up my mess is record time. I am pretty amazed that we lasted so long actually without a dishwasher. We really do cook a lot so it is definitely worth it for us and totally fine that we had to give up cabinet space. It is funny though because I think it is all about perspective since our new kitchen is pretty simple and still small. I guess I have been cooking in an old small kitchen for so long that pretty much anything is a huge improvement. Add on top of that a dishwasher and I am happy happy. Here are a few fruits of my labor in our new kitchen. I have been into pie mode lately and made a few yummy ones.


Apple pie - my own creation.


Turnip and carrot pot pie - my recipe again.


Broccoli quiche - from Vegan Brunch

Broccoli quiche - from Vegan Brunch


Pumpkin pie - recipe from Vegetarian Times

Wednesday, November 18, 2009

Monkey pants tutorial

I have made a lot of the monkey pants from the pattern I purchased from danslalune on etsy. I received an email from someone asking if I could do a tutorial on how I make the pants. The pattern is super cute, but putting it all together is a bit challenging at first. The main challenge is the gusset portion. I did change the pattern around a bit to accomodate non-stretch woven fabric and also sized it up to fit my 18 month old. However, the orginal pattern will work fine as long as you use stretch knits. Here is how I make the pants.

1. Cut out the pattern pieces. I am using recycled microfleece for these pants.


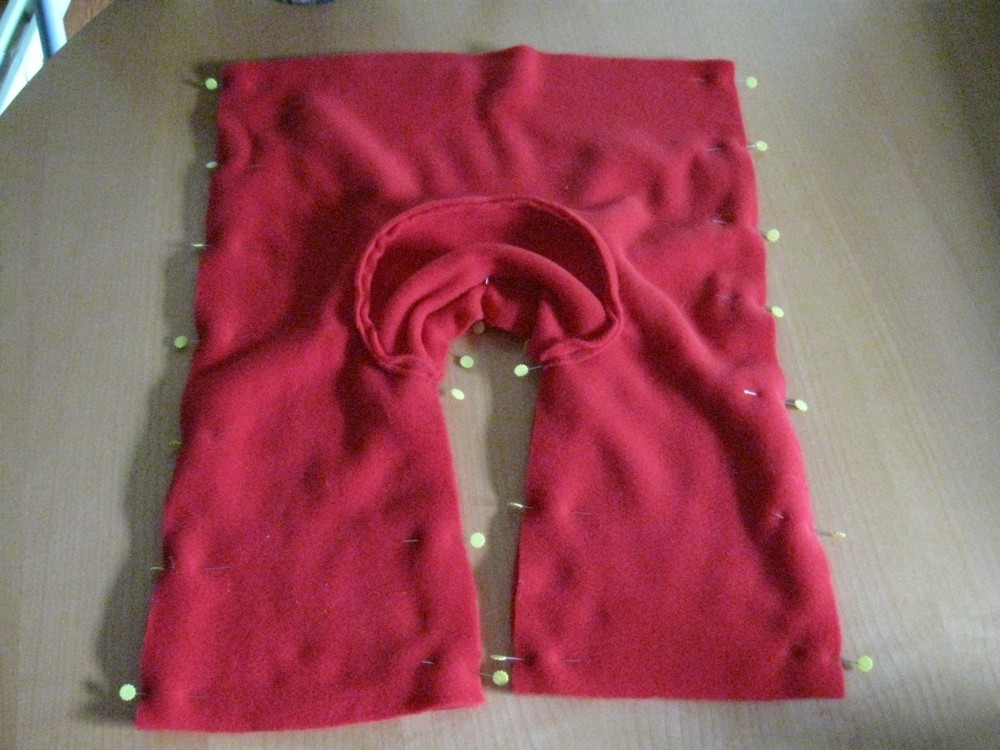
2. Open the pants back and lay flat. Line up the gusset piece with the larger curved portion facing upward as shown.

3. Pin the gusset into the back of the pants. I like to start at the ends and center. I then work my way around to fit in the gusset.

4. Sew in the back gusset. Pin the front and back together and sew.


5. Now you can sew the top casing and hem the pants as you would any other pants. Hope this helps!

Thursday, November 5, 2009

Carob graham crackers


We finally remodeled the kitchen and now have a dishwasher. Yahooo!! I love the dishwasher. I also love that I can now open the drawers and not worry about all the saw dust going on the pots and pans below. Let's say our funky 1958 kitchen seriously needed some improving. You can judge yourself by the before and after pictures. I have been cooking and baking lots and lots of fun stuff in the new kitchen. A fun baked goodie that I made recently was carbo graham crackers. I got the recipe from Jennifer McCann and the Vegan Lunch Box. Great recipe and really easy to make. The crackers can be made with chocolate also, but I went with the carob. Jonas really likes them a lot. Yummy!


Sunday, October 25, 2009

Toddler and baby shoes


I am still making shoes for the little guy. He started walking about a month ago and I find the soft sole shoes are great for toddling around. I use them outside also and though they don't last as long as hard soled shoes, they are pretty durable. I made two sizes for the pattern including 6-12 months and 12-18 months. The shoes are pretty forgiving with respect to size and allow for lots of wiggle room. The pattern is pretty simple and based on the slipper style shoes you see in the stores. I also made the sole so there is no left or right shoe. I find it a lot easier to put on a wiggly toddler. I made the following shoes out of denim material I had left over from his recycled jeans. I used scraps of black vinyl to line the bottoms so his feet stay dry. The pattern is in three pdf files that you can download below.

Toddler and baby shoes

Here is the shoe pattern in page1, page2 and page3. Below are the sewing instructions.

Note: A quarter inch seam allowance has been added to the pattern. You can use more if you want the shoes to be a bit smaller.

1. Cut out the pattern pieces. You will need two of each for the inside and outside fabric.


2. Zig-zag all the pieces if you are using material that frays.

3. Sew the front inside and outside fabric pieces together on the shorter curved side. Turn and top stitch.

4. Sew the back inside and outside fabric pieces together along the top edge. Turn and top stitch along the top and about a half an inch down from the top to form a casing.


5. Grab the shoe bottom and pin on the front and back of the shoe. Sew together and turn right side out. You are almost done.

6. Cut a piece of quarter inch elastic and thread it through the casing. Stitch the elastic together and tack it to the shoe front. All done!


Thursday, October 15, 2009

Not so lardy cake


I made this sweet bread a few years ago and decided to make it again. It is similar to a raisin bread. It was really easy to make vegan by replacing the "lard" with Earth Balance shortening. I think last time I made it I used Earth Balance margarine and dubbed it the "Margy Cake" so now it is the "Shorty Cake". The recipe is from Bread - the breads of the world and how to bake them at home by Christine Ingram and Jennie Shapter. The description in the book says it is a special rich fruit bread that was made in England for celebrating the harvest. Happy harvest!

Wednesday, October 7, 2009

Fleece vest to sleep sac


I am definitely getting into recycling mode. I have to say it is really satisfying to find something at a thrift store and give it a new twist. I found a medium size fleece vest with a full zipper and thought it would perfect for a sleep sac. I used the same pattern as the hemp sleep sac. I removed the pockets and cut through the zipper to make room for the neckline. I cut one inch binding strips and finished the neck and arm holes. I have to say the best part was not having to sew in the zipper. Though it is not difficult to do, I find it a bit cumbersome and having it already done was great. I think the whole project only took about a half an hour and cost about $4, so very nice.

Tuesday, October 6, 2009

Fruity baby sweater


My adorable little niece is turning one this weekend. Very exciting! We are planning a road trip to see her this weekend and celebrate. Little guy is going to love hanging out with his cousin. I made a sweater for her birthday. The pattern is from Natural Knits for Babies and Moms by Louisa Harding. I made the Kai sweater. The yarn is recycled from a white sweater I found at the local thrift store. I took apart the sweater and dyed the yarn in tangerine, cherry and lemon. I am really getting into the recycled yarn and fabric. I found a cool website called Wardrobe Refashion where everything is made from recycled fabric or yarn. I hope to make the pledge soon myself and commit to using only recycled goods. Check out the blog if you haven't seen it before. There are some really great projects posted.

Natural Soap Making and Himalayan Salt Soaps

I have been making natural soaps and shampoo bars for a few years now. I started making soaps for the local Halo Salt Spa back in 2015. I...